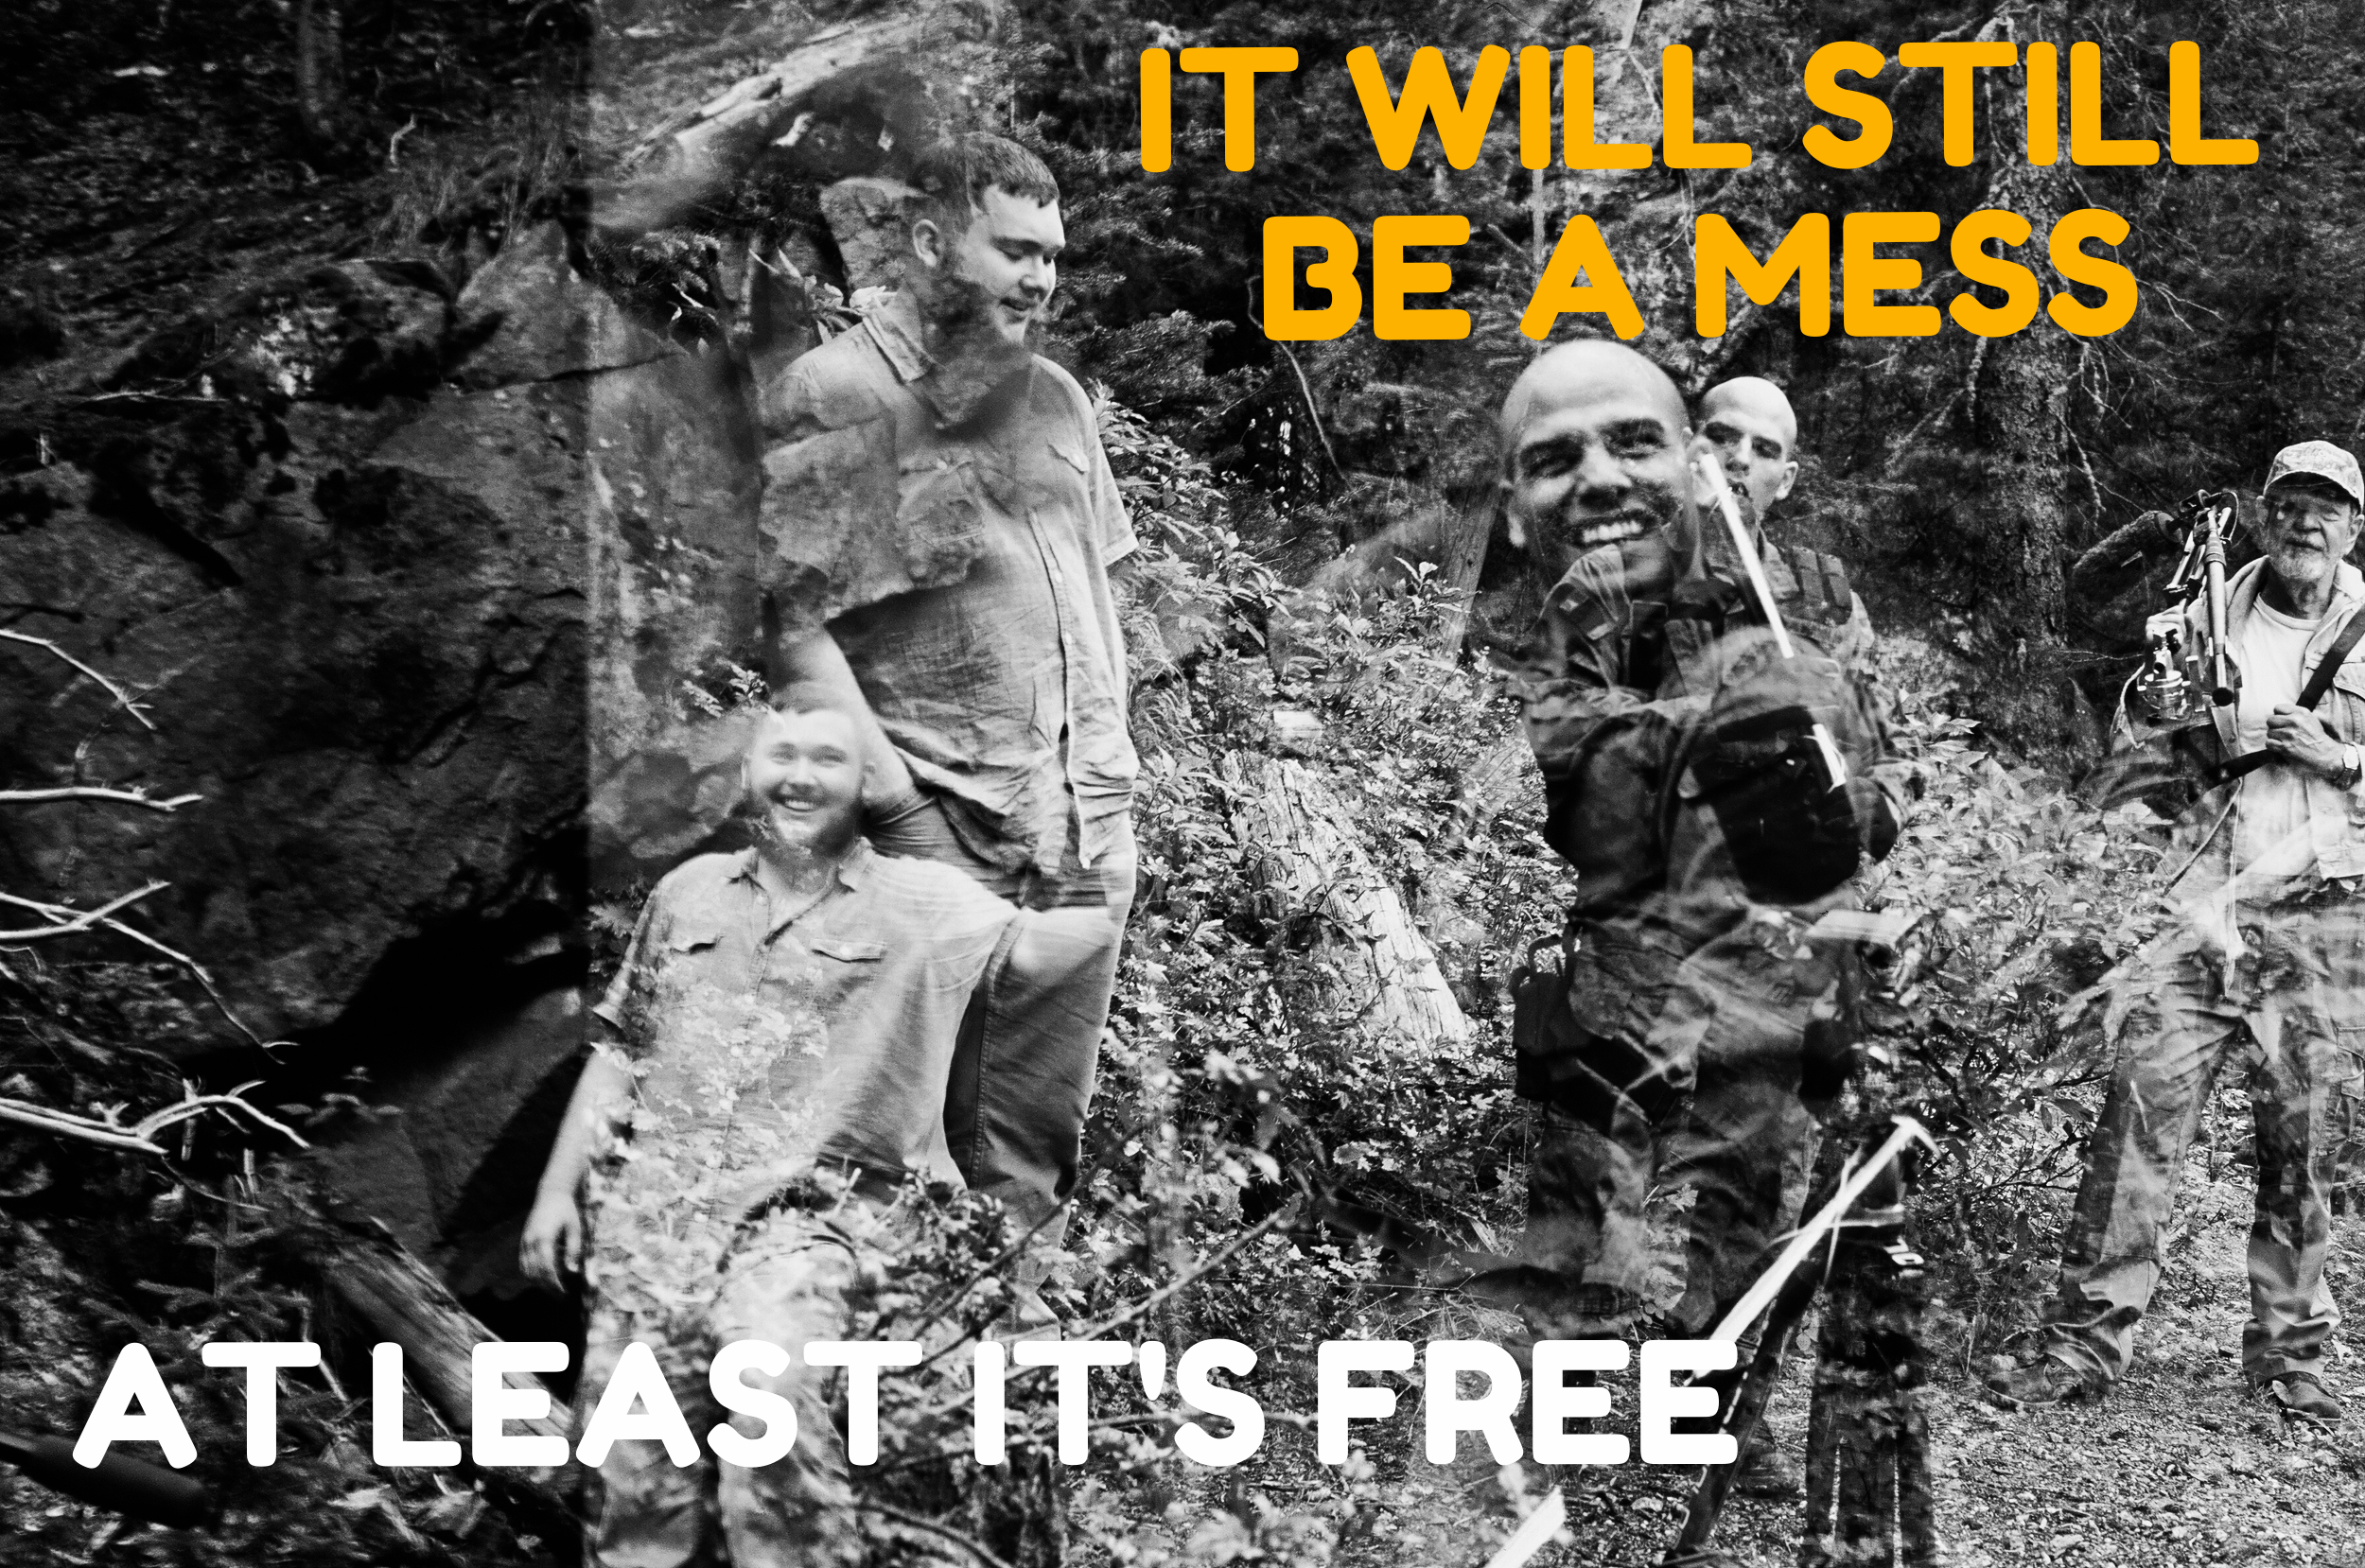
8 Tips for Making a Quality Short Film For Free

Filmmaking is a perhaps the supreme art form. It is grand in scale, and can resonate on the truest of human levels. It makes sense that every year more and more people are drawn to making films, and telling a story of their own.
Unfortunately filmmaking isn't the most affordable of art form. Its collaborative nature, and ever growing technological aspects can make a film of substance very difficult.
Creating a piece of cinema that connects to an audience is your cross to bear; the price tag shouldn't have to be. So here are a few things to keep in mind for when you dive headlong into your short film...
1. DON'T SHOOT ON FILM
There's a reason this is number 1. Yes, I respect your candor. Film is a great medium. Counterpoint: Film stock isn't free. Film developing isn't free. Film transfers aren't free. Make something great digitally first. If this is a deal breaker, you don't actually want to shoot a free film, you're just grouchy it isn't free.
(Sidebar: If you can get all that for free, you had better be shooting on film)

2. COLLECT FAVORS
The film community is very synergistic, and the best currency is the working relationships people share. Relentlessly be there to help when favors come up to cultivate these relationships with skilled professionals who may also have material resources. If you don't have film pals already, hop on Craigslist or Mandy.com, and scope out new connections.
An important note here is to not be the dude who keep score and holds it against people. That's the best way to not get what you want, and alienate yourself. If you do keep a mental tally, do so to make sure you're doing enough for others, not the other way around.

3. USE "COOLNESS" OF THE PROCESS TO YOUR ADVANTAGE
Making movies is cool, especially to those who have never seen a working set. There are hoards of people who would love to experience just being there. To some, holding up a bounce card, or running cables is an exciting prospect. And let them hit the red button? These folks may not be the most skilled on the set, but they'll totally drink the Kool-Aid.

Being able to say "I helped with 'X' on that film," is something that most everyone loves to say. Whether that help be in material goods, or labor, leaving this resource untapped means leaving money on the floor.
4. BARTER/TRADE-OUT
You're making a film. You have a skill. Offer up that skill in return for a good or service. Offer to take pictures of the menu items of a restaurant you want to shoot in. Give a company that may like your final product the opportunity to have their name be the first thing on screen (Example Company, Inc. Presents...), if they'll loan you some props.

the single image that served as a location fee from a restaurant (plus it brought in future paid business for us)
As long as you're not asking a person or establishment to take on a hard cost, or inhibit their ability to conduct business, there are myriad ways to incentivize their involvement.
5. FIND PUBLIC LOCATIONS WITH NATURAL LIGHTING
Look around your area for public places you can shoot in. Parks are a great place to start your search. Just make sure you check with the necessary park department to make sure it's all legal. Sometimes the difference between being allowed or not is as simple as whether you plan to mount your camera on a tripod.

6. SKIMP
In my experience this is the least fun thing you can do: water down your needs. Of course we all want to shoot with the most cutting edge equipment with name actors, but at the rate of free that's next to impossible.
Robert Rodriguez famously made El Mariachi, a full length feature film, for $7,000. Take a look at every item that costs money and figure out how to slash that cost. Rodriguez used a total of two lights from the hardware store. He refused to budge on one can of spray paint to repair one side of a damaged guitar case. Say no to paying for solutions.
Trust those that have gone before you, and that there is almost always a work around. Check out Shittyrigs.com for some prime examples of people out there making it work.
Borrow props. Use wardrobe you already own. Redecorate and recycle locations.
The Sleazeball Retail Borrow: Buy a thing you need, use it (very delicately), return it. This is almost certainly against the law, but it's a thing people do. I don't condone it, but it is something people do when they have no other option.
7. UTILIZE THE CURRENCY OF TIME
They say their are three dimensions to filmmaking: High quality, Low cost, High speed. You get to pick two.

take your time, and do it right
You're trying to take advantage of high quality, and low cost, so high speed should be of little to no concern to you. Keep the crew smaller but plan to take more time getting quality set ups. Get an editor that will do a good job cutting the film, but give them ample breathing room on the deadline.
Spend the days or weeks leading up to the shoot doing all your own prep work (costumes, props, storyboards, finding gear) rather than outsourcing that to someone else. This will also prime you to be more individually prepared to troubleshoot problems that arise yourself.
Taking a little extra time may be the only difference between finding the freeway, or paying the toll so-to-speak.
Remove as much speed as you can from the equation so you can focus on the other variables. Relish the fact that if you do forge a career in film, you'll never get this luxury again.
8. ALWAYS, ALWAYS, ALWAYS GIVE IT A SHOT.
Never assume you can't get something for free. Never assume something won't work, or that it's too far fetched. ASK.
I have always been shocked at the things I've gotten from a warm smile and a polite request. From the keys to a silver smithing studio (filled with silver), to using a brand new upscale restaurant, to storage facilities, to camera gear, to free food for the crew. The list goes on.
People truly in their hearts like to support the arts, and that's the most important aspect to all of this. Approach every turn humbly, politely, and enthusiastically, and doors will be opened.
On behalf of artists and filmmakers everywhere, don't squander the opportunities at hand. Respect everyone that gives you anything, even if it's just five more minutes of not mowing their lawn while you get that last shot.
Now go out there, shoot that thing you've been talking about for weeks, and make sure you pay for NOTHING...
In the next post, I'll talk about my experience in post-production, or as I like to call it, the part where geniuses thanklessly, invisibly polish my turds.
-T
*For any questions on the process, or any of our short films, feel free to hit us up over on our contact page.
Guns, Squibs, and Not Killing Anyone on Set
Milquetoast Process: Behind the Scenes Satori 3, & A CASE FOR AN ARMORER...
In the spirit of the previous post on movie blood, this post will deal with the pleasure/chore of working with firearms and charged squibs. Fortunately I've also had the luxury of having skilled personnel to keep us safe, and consult with us to make sure no one looks like a nincompoop.

Chris McGillivray, testing a revolver during the shoot from Mouth Breather
WHAT AN ARMORER DOES
Mainly, they handle the not-getting-anyone-killed part. Typically on set an armorer, or weapons master, works with the prop master to maintain control over any weapons related props. The main goal is to ensure the safety of everyone present on set. The last thing prior to rolling camera is handing the talent a weapon, and the first thing after calling "cut" is securing that weapon. Preventing accidents, no matter how little the chance, is the most important thing on set.


GUNS
We had a skilled weapons expert, K.R. Olson on as our armorer for both Mouth Breather and Satori. Our working relationship didn't begin as an armorer on set, but rather as a consultant prior to filming. On both shorts we needed weapons that were era specific (1970's and 2070's). We settled on two revolvers (more on that in a minute), and a Tavor bullpup.

Live fire (blanks) on set of Mouth Breather. KRO just out of frame (shadow at right)
Something many people don't know (formerly myself included) is that you can't just go out a buy a box of blanks, and pop them in a gun. Some weapons require modification to accommodate them. Fortunately on Mouth Breather we were using revolvers, which can have blanks loaded and function normally. Still, you can't waltz into Walmart and buy a box of blanks. That's where someone like KRO can be a huge help.
SQUIBS
The real thing just looks better. It's tangible and physical. The actors react the right way. It doesn't take hours of compositing in post-production. It's simple. But it's still a tiny explosive.
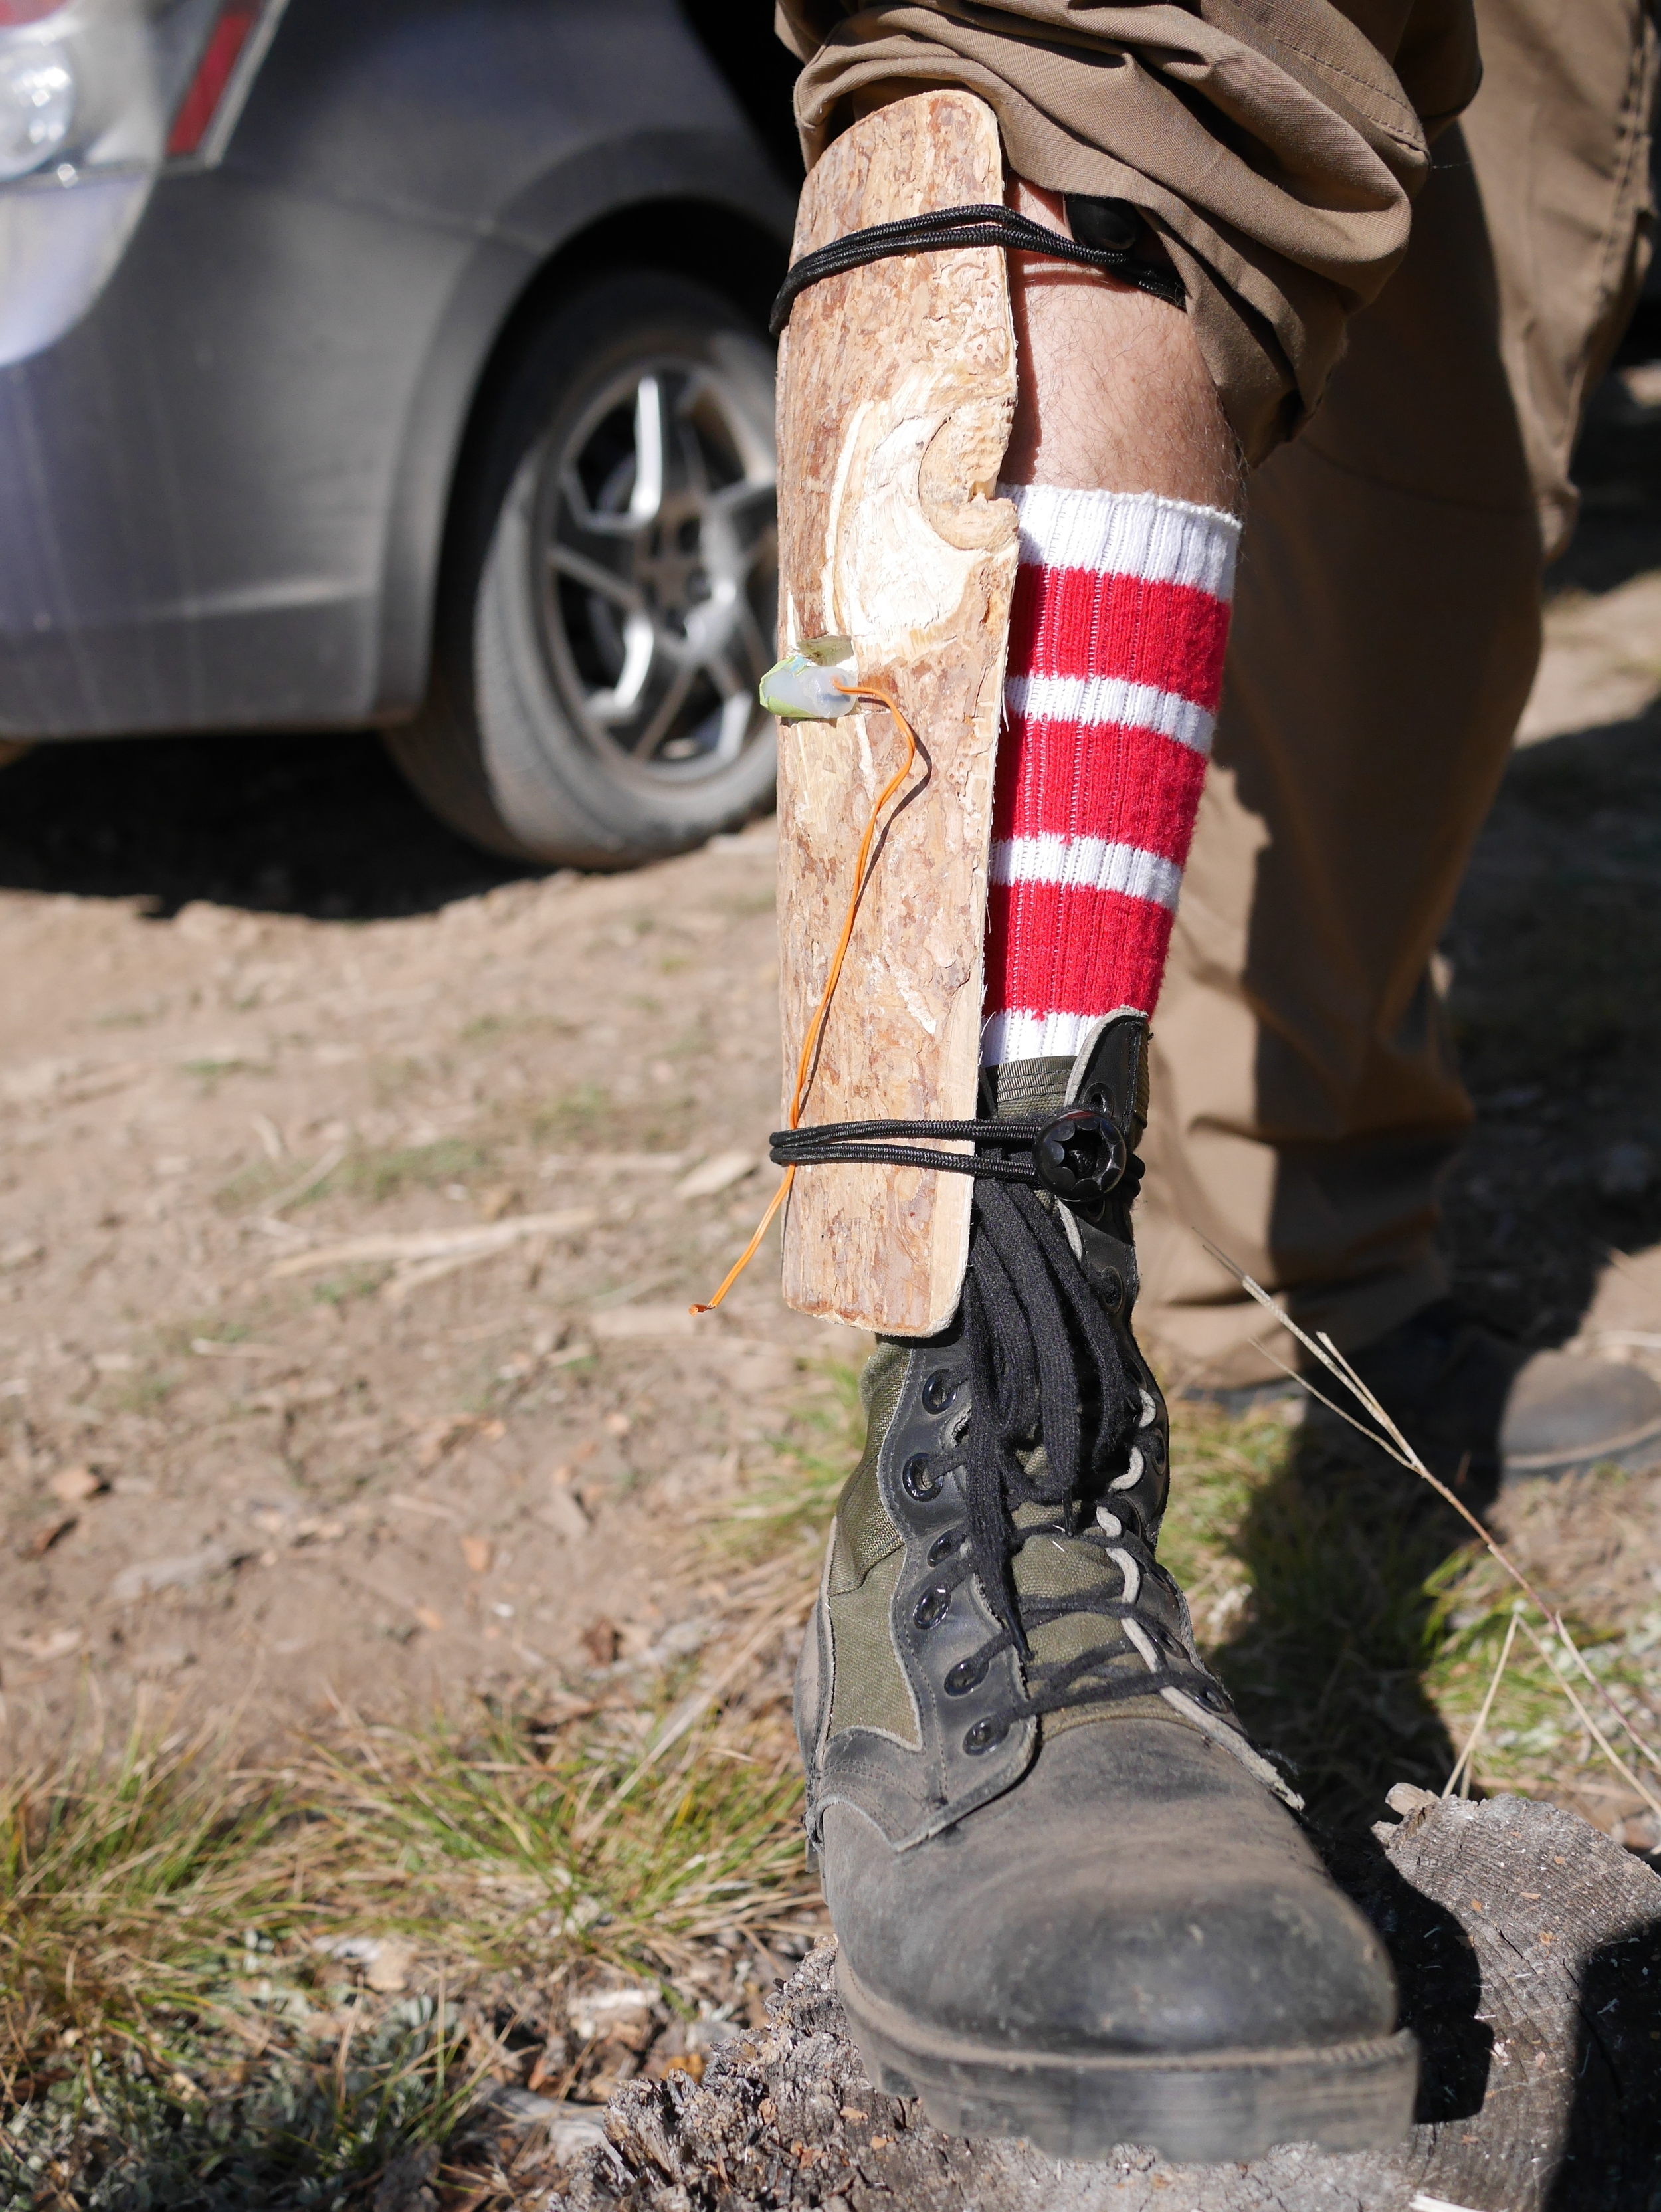


KRO was a big help with squibs as well. On Mouth Breather we only used the charges to make bits of dirt and tree bark fly around, but for Satori we wanted the effect to be a shot to the leg. We took all the necessary precautions in both cases.
TROUBLESHOOTING
As with everything in film, there are snags. Sometimes an actor may need assistance using a weapon, or pointers on how to look more professional (Tosin Morohunfola had never fired a gun prior to Mouth Breather for example).
Or sometimes shit don't work. And it's good to have a guy.

A dud charged squib test; KRO seconds later "Well... I don't like that."
All in all I guess that's the point here: It's good to have a guy. I've found it important to surround myself with people I can trust, and especially so when there's dangerous tools involved.
KRO, a good guy to have:

The next post will be 8 tips on how to make a short film for free. Pretty straightforward.
-T
*For any questions on this process, or our short films, Mouth Breather or Satori, feel free to hit us up over on our contact page.
** Special thanks to Estes Arms as well for all their help

How To Make Movie Blood That Doesn't Suck
MILQUETOAST PROCESS: BLOOD
In the last couple posts, we talked about the process of making the featureless silicone Humanoid mask (part one, and part two). In the spirit of continuing talks about some basic special effects, this post will deal with making blood for the screen, rather than hunting down where to buy stuff that costs more, and looks less realistic.

a still from Falling Apples using this recipe
If you just buy fake blood, chances are it will suck. It will probably be watered down corn syrup, and red food coloring. That's it. And if you look for how the Hollywood guys do it, there are surprisingly few good resources.
There's a million ways to skin a cat, so-to-speak, and depending on the type of blood (like unoxygenated arterial blood vs. pooled blood vs. dried blood) there's different aspects, you'll want to tweak.
Those different aspects are not what this post is about. This is how to make as close to a catch-all as possible. This is some good-looking general blood, and aside from the fact it gradually gets stickier as it dries, it's pretty all-around nice.
The last batch I made was enough to use pretty liberally for two entire short films (Falling Apples and Satori) with some left over.
Here we go...
Supplies:
- 16 fluid ounces light corn syrup
- 1 ounce red concentrated gel food color
- 1 ounce black concentrated gel food color
- .25 ounce standard yellow food coloring
- 1 liter contaner
- stir stick
Simple enough steps
some smeared blood that doesn't look like Code Red Mountain Dew
STEP ONE: Pour the light corn syrup, and all of the red concentrated gel into your liter container. Stir.

The key is that the concentrated gel won't thin down to pinkish as easily which would look totally fake.
- PROBLEMO UNO: This probably looks pretty good, but if you've ever given blood you know by comparison this stuff looks like candy. Blood is actually pretty dark stuff. If you use this on a light colored shirt, for example, it's going to look like they spilled cherry limeade on themselves. So...
STEP TWO: Dip just the tip of your stirrer into your black food color. Add a tiny amount into your red mixture and stir. I can't stress tiny enough. Stuff goes a long way.

a dab'll do ya.
You're going to add just a touch of black to get rid of the bright red color. You can always add more. Very difficult to add less.
- PROBLEMO DOS: Thinned blood shows the oxidizing iron in its cellular makeup, red food coloring plus corn syrup does not. So...
STEP THREE: Add all of the yellow food coloring. Stir.

if adding it all makes you nervous, add half first and see how little it does
The yellow will be totally invisible in the bottle of blood, but if you spread it thin, rather than getting the dumb looking pink smear, it'll be a subtle rustier color. Now this stuff looks good.
- PROBLEMO TRES: What did you do, stab King Kandy in his castle made of sweets? This is probably the thickest blood on earth.
STEP FOUR: Water it down to desired consistency.
You can really dilute this without losing the color. Try dripping some off of the end of your stir stick to test the consistency. Real blood is pretty cohesive but it won't gum up at all. Adjust the viscosity until it starts feeling like a thick liquid, and stops feeling like a syrup.
That's it. You should have pretty close to a liter of all purpose screen blood. It's non-toxic, will look okay as it gets diluted, even in a pool of water, and will stain like crazy. Have fun!
TIP: Hold the stuff up into some good light. Look at the glare. The blood should look deep red, while the glare should have a yellowish twinge to it.

note that the blood appears iron-y when thinned as opposed to looking like left over maraschino cherry juice
In the next post I'll talk about my experience with firearms, and the importance of having a dedicated armorer.
–Tyler
*For any questions on this process, or our short films (including Falling Apples and Satori), feel free to hit us up over on our contact page.
PS. If you're shooting in black and white take a lesson from Hitchcock, and just use chocolate syrup.

How To Make a Silicone Mask (Pt. 2)
Milquetoast Process: Behind the Scenes Satori 2, MAKING A HUMANOID continued...
This post is a continuation of the silicone mask making process started in this previous post for the short film, Satori. This post will cover the remaining process of the clay mask sculpt, the resin mask negative mold, and the final silicone mask.
the Humanoid in full effect on set
PREAMBLE
This is the labor intensive portion, and the higher stakes half. The materials are trickier, and more costly. They take longer, and are the most frustrating. They're also the coolest.
Here we go...
Supplies:
- Plaster of paris head cast
- Petroleum jelly
- Oil based modeling clay
- Cellophane plastic wrap
- Aerosol acrylic sealer
- Polyurethane resin
- Polyurethane fiber
- Wood scraps
- Water based clay
- Release agent
- Paste wax
- Silicone
- Thickener
- Silicone pigment
- Flocking
- Various chip brushes
- Various mixing cups
- Nitrile gloves
STEP SIX: CLAY MASK SCULPT
This step is actually very straight forward. We rounded off the protruding ears of the plaster head mold from the previous steps, as well as any lumps from mold imperfections (these wouldn't be there if we did a better job in the first portion). We also shaved down the nose a bit so that when the final mask is made it will have a nice snug fit on Alex's face, and not flop around.
A very thin layer of petroleum jelly was applied to the plaster head before any sculpting to keep the dustiness down and allow the clay to actually adhere. From here, it was just as simple as sculpting the oil based clay atop the head into the look we wanted of the final mask.


Laying the plastic wrap on the clay and drawing the wrinkles in with a dull pencil is about as easy as it gets. The difficult part is getting the clay absolutely smooth, as even the slightest imperfection will show.
STEP SEVEN: RESIN MOTHERMOLD
Now things start to get a little higher stakes, because if we botch something it's pretty much all the way back to step one. First we seal the completed sculpt with the acrylic sealer.
completed, sealed Humanoid mask sculpt
We decided to prepare the mother mold on the front side first because we knew we'd have to lay it horizontally and a small flat spot on the back will be a lot easier to fix than a mashed in nose.
So we gently laid the sculpt horizontally, face up, and stacked the wood blocks around the perimeter. The water based clay was then placed on top of the scraps of wood up to about the half way point. The clay should be nice and flush to the mask sculpt and also very flat.
water based clay wall around mask sculpt
Not pictured here is the need for a register of some kind. We just took a nice wide paper clip and dug several grooves into the clay. This will ensure the two halves fit together exactly and lock in place. You can see the results of this in the pictures ahead.
We sprayed the whole thing down with a liberal coating of the release agent. Following the instructions for the product we mixed our polyurethane resin and applied a thin coat without fiber to ensure we got all of the finer details from the sculpt. Then we mixed another batch adding the polyurethane fiber to it until we got a nice peanut-butter-y texture (adding less fiber and the resin will be too drippy but too much and it becomes brittle and less detailed). A first coat was applied, and set before a second coat to ensure proper thickness.
first half of the resin mold after both coats are applied
We made sure we had a totally cured front half before moving anything by allowing it to sit for at least 24 hours. Then its flipped over, the wood scraps and clay are removed. Some of the resin that squeezed out is removed and smoothed as well. You can see the registry slots carved into the front half in the second image.


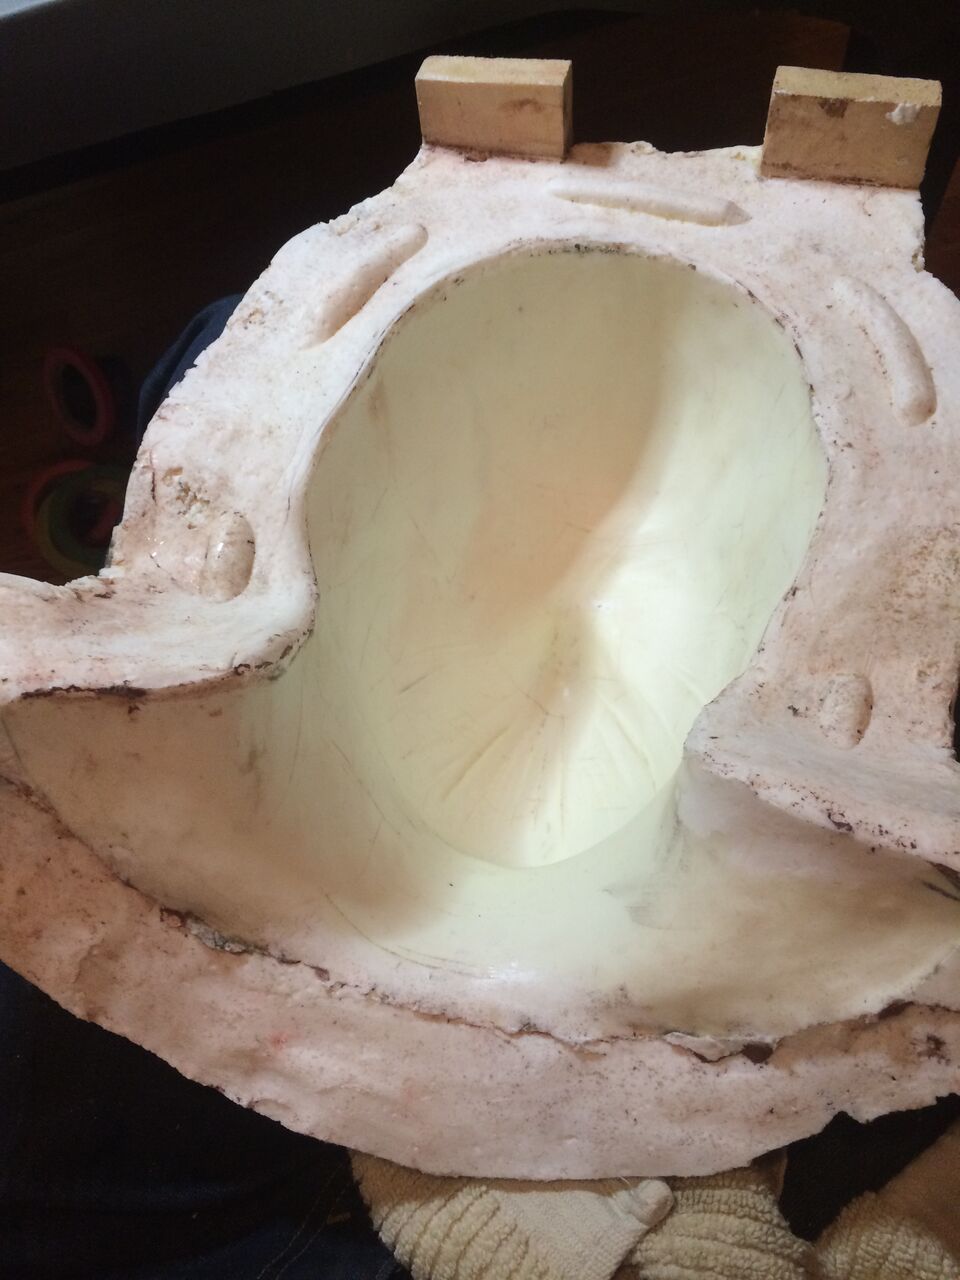
The clay was scrubbed off of the resin and a coat of the paste wax was applied. The release agent spray then coats everything. You can see we added two pieces of the wood scraps at the top to fashion a stand for when t's inverted to add the silicone. Once everything was prepared we followed the same process as the front and created the second half of the resin mother mold.
second/back half of the mother mold
Again, we made certain everything was properly cured. We had to once again shave off some overflow so that the two pieces would separate. We said a prayer to everything holy that we did it right because taking it apart was about to ruin everything prior to this step.

So now that we had totally destroyed the sculpt, we had not the left but hope the negative mold took and move onto the final step.
STEP EIGHT: SILICONE MASK
This step was particularly exciting. The two washed and dried halves of the mother mold are ratchet strapped together to ensure a tight fit and the silicone is mixed.
Silicone comes in parts A and B and they are combined 1 to 1. It's better to do this by weight but without a scale we just used careful volume measurements. A few drops of the thickening agent was added to get the silicone to a spreadable consistency. A dab of the silicone pigment was added to give it a flesh base.
The thing that really gives it an authentic look, however is the flocking. It's a fiber that adds a bit of inconsistency to the solid-colored mixture like the properties of skin. We used a fair amount of flesh tone, and a dash of red and yellow until it resembles true flesh tone. A tiny dab of blue would have been nice in hindsight.
This mixture is then painted to the inside of the mother mold (a much better way to do this would have been to injection mold this so that it was totally consistent and form fitting, but that would have been substantially more costly and time consuming in preparation).
first coat of silicone
We did three coats. The final coat used more red flocking (as of it we deeper bloodier tissue beneath the lighter tissue). The first mask was a little messy, so we made an additional two masks learning as we went.
first mask prior to cleanup
STEP NINE: TOUCHUPS AND FINAL TOUCHES
The flashing (dingle-dangle crap hanging off at the seams) was trimmed carefully with a very sharp blade. Sanding didn't really work in our experience because the silicone was too elastic.
Baby powder was coated on the inside. This makes the mask less prone to sticking to the skin of the wearer, as well as soak up any residue from the silicone.
A few sources online indicated that diluting some clear silicone caulk and adding pigment to that mixture would make for a good compatible silicone paint, but we didn't have much luck with this.
We cut a few slits into the wrinkles of the mouth to provide breathing holes. Not a lot we could do for improving the vision though...
In the next post, I'll talk about my experience with movie blood that doesn't suck (which is strangely difficult to find pre-made).
–Tyler
*For any questions on this process, or our short film, Satori, feel free to hit us up over on our contact page.
**Special thanks to the fellas at Brink in The Yard Mold Supply for sharing their knowledge of all the materials needed throughout this process.
How To Make a Silicone Mask (Pt. 1)
Milquetoast Process: Behind the Scenes Satori 1, MAKING A HUMANOID...
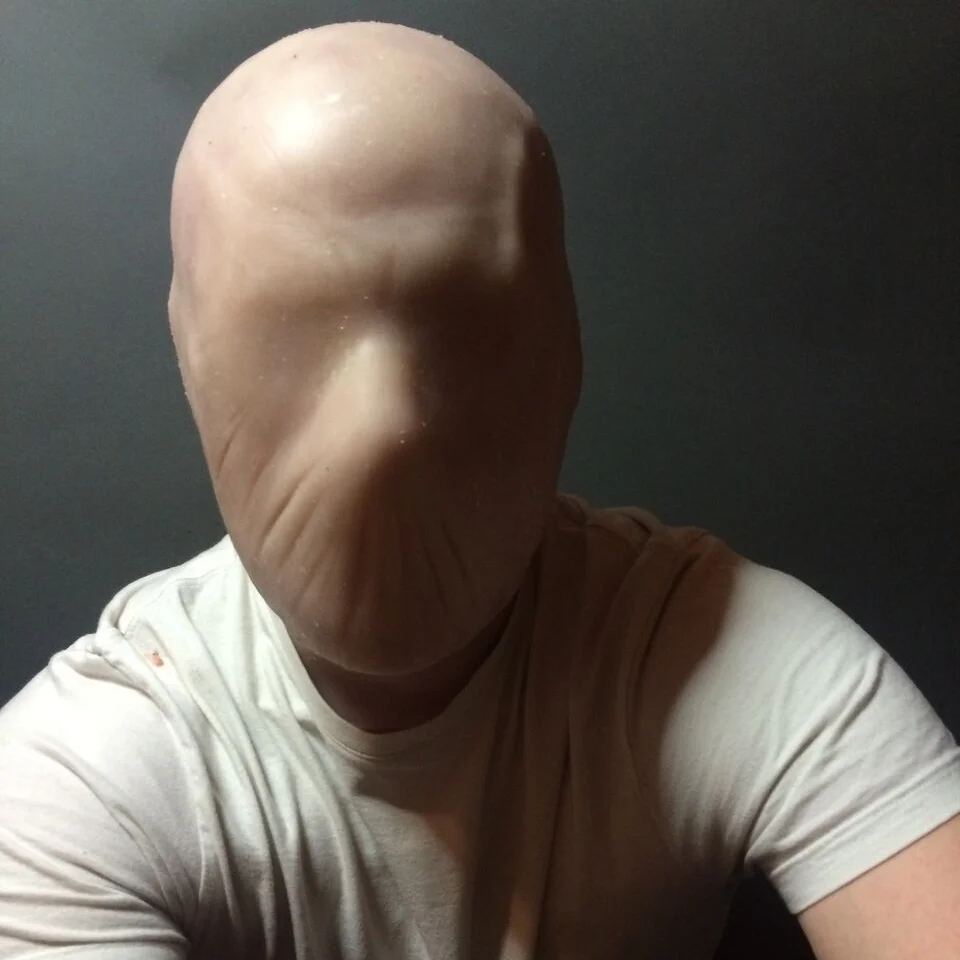
This post will discuss the process of creating a custom silicone prosthetic mask (part two here). In our case it was to create the featureless appearance of The Humanoid for our upcoming sci-fi short film, Satori.
the semi-finished Humanoid mask.
There are several steps to this process, so this post will only cover our initial mold making process.
Some places online will recommend using a polystyrene (styrofoam) head as a foundation for the mold making (as seen here). While this may not be a bad idea in most cases we knew our design would probably already make breathing more difficult. We instead opted for an exact fit by doing a life cast of our actor.
PREAMBLE
When doing life casts of the head or face the subject will not be able to speak, so make sure they have another way to communicate. We used thumbs up as "yes," or "I'm ok," and a flat handed palm tapping on the knee for "no," or "everything is not ok."
Here we go...
Supplies:
- 2lbs alginate
- 5lbs plaster bandage
- 18lbs plaster of paris
- 2 large buckets for mixing
- water (either several gallons or a flowing source)
- 100% pure petroleum jelly
- dull cutting instrument (like plastic cutlery)
STEP ONE: ALGINATE LIFE CAST
For this step we needed approximately 2lbs of alginate (available here). This is the same type of material you might find in a dentist's office to take casts of your teeth. It sets fairly quickly and is straightforward to use.
Once the water is added the clock starts ticking. The second it sets (which happens abruptly after a few minutes), thats it. You cannot add more alginate on top of set alginate. We actually overestimated our first batch and made it too runny to build up a mold before it set. Fortunately alginate is one of the more inexpensive materials in this process so it wasn't that heartbreaking to have to take a second stab at it.
Before we mixed any alginate, we spread petroleum jelly over (our actor) Alex's skin in a thin layer to avoid it sticking and getting damaged when you remove it (too much jelly and the alginate will just stuff off) especially areas like eyebrows or whiskers. If you are casting someone with a head of hair (we fortunately had the luxury of a baldy) avoid this area, or protect it with a bald cap prior to applying alginate.
We wrapped anything we weren't casting in plastic (torso, legs, etc.). Alginate is a very mild substance, and stays quite soft to the touch, but it's not what I would class as super-easy to get out of clothes.
I suppose I should note that we provided a way for the subject to breath/live while building up the thick alginate. A couple straws were enough in our case.


STEP TWO: PLASTER BANDAGES
With the alginate in place at least 1/4-1/2" thick, we reinforced the mold with plaster bandages (available here). Alginate is soft and tears easily so it won't support itself or the weight of the material poured into it in the next step.
We only covered the front half to start. We had to be able to get this off of Alex, and if we didn't do it in two parts, they'd be sealed in a durable head cast.
the front portion of the reinforcing plaster bandage.
We cut the plaster bandage into pieces about four feet long and 6-8" wide so it's more friendly to use. After wetting the bandage in lukewarm water, it's folded in half lengthwise (so now it is 4' long x 3-4" wide), and gently squeezed of excess moisture. It should be wet but not dripping. The bandages are applied in overlapping layers until its a nice firm shell covering the front half of the subject.
Before we moved on to the back half, we applied a nice thick ribbon of petroleum jelly to the edge of the front half, approximately 1" wide, all the way around. This ensured we didn't lock the two halves together where they overlap.
The same process of the first half is repeated leaving a slight gap (1/8" or so) between the two halves. Once this is completed, we took one final piece of plaster bandage, folded over a second time to make it twice as thick, and covered the gap (making sure we did not exceed the petroleum jelly buffer on the front half).
STEP THREE: DEMOLD LIFE CAST NEGATIVE, REBUILD
The plaster bandages set up relatively quickly. Once they were dry throughout and solid, not flexible to the touch, we gently pried the back half off. We took extra caution not to damage either the soft alginate beneath the shell, or harm Alex underneath that. No sharp objects. We set the back portion aside.
With a dull object like a coffee stirrer or the dull side of plastic cutlery we made a zigzag cut down the exposed back of the alginate mold. The zig zag pattern will hold together much better than a straight line during the mold pouring process.
The moment of truth. Alex leaned forward and held the front half of the shell while we carefully began to loosen the subject from the cast, taking care not to tear the flaps of unprotected alginate.
Once free, we placed the back half of the plaster bandage shell back on the cast and carefully pressed the alginate inside back into its molded position. The zig zag cut holds much like a zipper.
This is the negative mold of the life cast.
STEP FOUR: POUR POSITIVE MOLD
We mixed enough plaster of paris (available and virtually all hardware stores) to fill the empty mold. We also placed an empty water bottle in the mold's cavity to reduce the weight and plaster used.
STEP FIVE: DEMOLD LIFE CAST POSITIVE
We allowed the plaster ample time to fully set before demoldig. Unfortunately I don't have any photographic proof I actually finished this specific step, but it looked like a slightly lumpy version of Alex (this is because we didn't do a knockout job in the alginate step, and some areas we a little thin).
The alginate is discarded as it's not designed to last more than one cast. It's pretty much destroyed in the demolding phase.
It is this plaster head onto which we will be sculpting the look of our new mask...
In the next post: the clay mask sculpt, the resin negative mold of the cast, and the final silicone mask.
–Tyler
*For any questions on this process, or our short film, Satori, feel free to hit us up over on our contact page.
**Special thanks to the fellas at Brink in The Yard Mold Supply for sharing their knowledge of all the materials needed throughout this process.